Authentication
The CAPA API implements the OAuth 2.0 spec in order to handle user authentication. You need to register a client app against the API, which will give you a client secret. You’ll then send the client identifier and client secret across when doing most types of authentication grant requests. The basic flow is you authenticate against one of the grant types, and if successful, you’ll get an access token (and maybe a refresh token) as a response. The access token will be valid for a certain period of time, and you will attach it as a HTTP header to all your API requests.
Note: many developers who have not dealt with OAuth before struggle with the concepts, so you're not alone here. It is the main thing we are contacted about when it comes to supporting the API.
- Grant Types
- Scopes
- Registering a Client
- Configuring a Client
- Application to Application
- Getting an Access Token
- Access Token Parameters
- Using an Access Token
- Refresh Tokens
Grant types
Before you start working with the API, you need to decide on what kind of application you're making. What you decide will affect which grant type you use to get an access token.
In OAuth terms, a “grant” is a method of obtaining an access token. The CAPA API has 6 grant types, although 3 are directly available and 1 is indirectly available to third parties. The grant types are:
| Grant type | Available to third parties | Description | App type |
|---|---|---|---|
| authorization_code | Yes | This is accessible by all clients, and should be the grant type you are using if you are building a user-facing app and can keep the source code hidden (as you will be transmitting your client secret). | Any interactive application that is used directly by end-users. The user would log in with their own details. |
| refresh_token | Yes | If a refresh token is returned (and it will be for password and authorization_code grant types), then the token can be exchanged during this grant type to generate a new access token, replacing one that is due to expire. | n/a |
| implicit | Yes | If you can’t secure your source code (ie. it’s Javascript being used in a browser), use an implicit grant. Implicit grants operate in much the same way as authorization code grants, however they don’t return refresh tokens (the client secret is never sent as part of any request so it’s less secure, hence no refresh tokens supplied). This means the user will have to re-log in every few hours. | Anything where source code cannot be secured (ie. browser-based app written in client-side JavaScript). |
| a2a | Yes | This is an application to application grant, and can only be called by first-party clients on behalf of users making third party clients (in short, it can only be used from within the CAPA website). Its purpose is to create a long-term access token that can be used on a non-interactive server-to-server application. | Anything that is automated and involves no direct user interaction (eg. server-side scripts that periodically run). |
| password | No | This is only accessible by first-party (ie. CAPA) clients and returns an access token if the username and password is directly submitted to the API. | Not available to third parties. |
| admin | No | This is an internal CAPA grant and is used so account managers can log into user’s accounts, for technical support purposes. | Not available to third parties. |
Scopes
OAuth has the ability to assign different scopes to access tokens, that is, different levels of access depending on what was requested during the grant. For now, the entire API only uses one scope, which is called user.
Registering a client
Once you have decided on which grant types you are using, it is time to register a client application. This will result in you getting a client identifier and a secret key - you will be using these details when it comes to getting an access token, so be sure to make note of them.
When you go to your account settings, an API tab will appear in the left column if your account has been set up for API access. If it's not there, contact your account manager. Note that the CAPA API is an addon to CAPA membership.

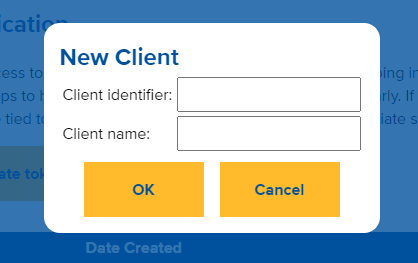
To register a new client, click the New Client button. You’ll be asked for two pieces of information:
- A client identifier. This is just a short, unique string that will be used to identify your client. Allowed characters are lowercase alphanumeric, as well as dashes and spaces.
- A client name. This would be the name of your app.
Upon successful registration, a popup will give you your client secret. Make sure to copy this somewhere, as it will not be shown again anywhere. You will use the client identifier and client secret when making access token grant requests.
Configuring a client
Once you’ve successfully registered a client, you’ll see it appear in your list of active clients. You can use the dropdowns to select whether or not to enable various grant types (the values immediately save when changed; there’s no “save” button to click). You can also delete clients, and add a list of approved redirection URLs.
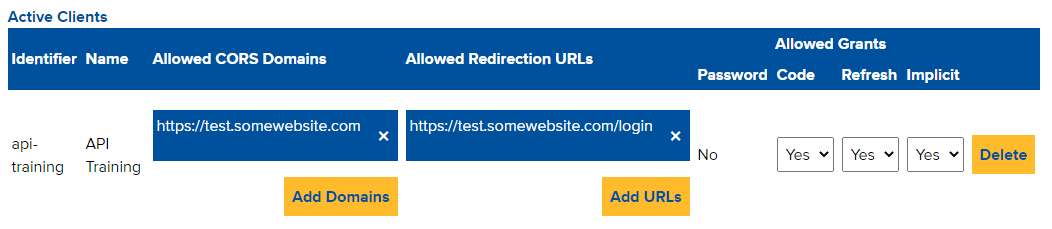
Allowed redirection URLs
You’re going to use one of two grant types to get an access token for user-facing apps – implicit or authorization code. Both will involve redirecting a user to another location to finalise the login. This is how those "login with Google/Facebook" authentication flows work, except in this case it would be "log in with CAPA." You would enter a list of “allowed” locations to redirect to – these would be locations that would read the query string parameters that are appended to the request. Typically you will only have one or two locations listed.
If this pre-approved restriction was not in place, it would be possible for another third party to request implicit grants for access tokens using your client identifier (as your client identifier is publicly available). Authorization code grants are protected against this as they require the client secret to be sent as well.
Allowed domains
If you’re making a web-browser based app that sends and receives data to/from the API via AJAX calls, you will need to specify the domain(s) that you’re hosting the app on here, including any protocol (eg. http/https). The values here will be checked against Origin headers that the browser will send with requests, and if they match then it will respond with the appropriate Access-Control-Allow-Origin header. If not, you’ll receive a 401 error.
Application to Application
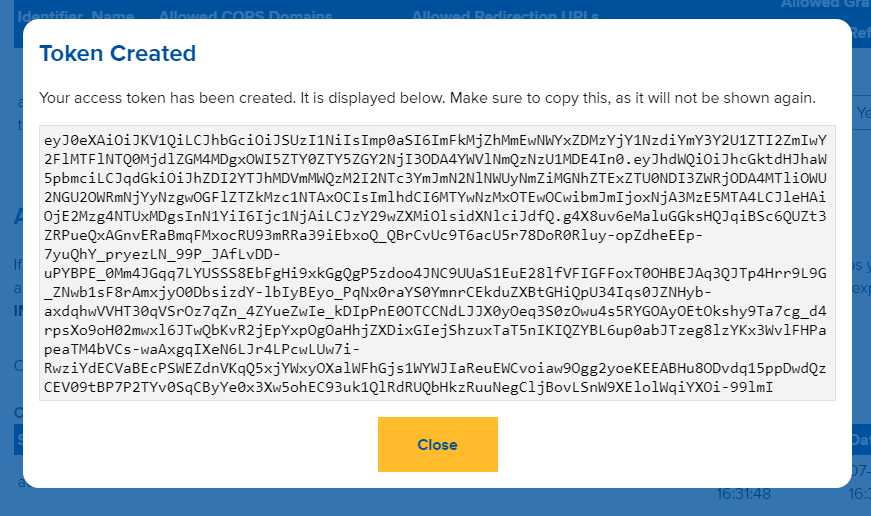
There are times when you’ll be developing apps that are not used directly by users at all, but may be things like server-side scripts that periodically connect to the API to pull down data etc. For these situations, you would use an access token generated by the Application to Application section.
It’s pretty straightforward – click on Create Token and you’ll be issued an access token for the selected app, tied to your account, that expires in a year’s time. IMPORTANT: No refresh tokens are provided, which means that you’ll have to set a reminder to update the access token you’re using on a yearly basis. Also note that the token is tied to your account, so ensure that your account has access to the things you want your app to be requesting.
Current Sessions
The Current Sessions table lists all active sessions for the selected client, as well as their expiration dates. They can be deleted from here as well.

Getting an access token
An access token will always be associated with a user ID. If you’re building an interactive client, this is how you’ll get an access token:
You present the user with a window that is pointing at https://centreforaviation.com/authorize?client_id={identifier}&redirect_uri={redirect_uri}&response_type={response_type}
IMPORTANT: Note that the domain for the window is centreforaviation.com and not api.centreforaviation.com. The parameters in that request are:
| Parameter | Description |
|---|---|
| client_id | This will be the identifier of the client that you have created. See the section on creating a client for more info. |
| redirect_uri | Tthis will be the URL that the user will be redirected to upon a successful login. See the section on Allowed Redirect URLs for more info. |
| response_type | This will be either code or token depending on the grant type you are going for. Use code if you’re doing an authorization code grant, and token if you’re doing an implicit grant. |
Once the user successfully logs into the site, they will be redirected to the location specified in the redirect_uri parameter (this can be any pre-approved URL) and various query string parameters will be appended to the request.
Implicit grant
If you had a response_type of token, then you’ve done an implicit grant. A successful user login will redirect the user to {redirect_uri}#access_token={access_token}&token_type=Bearer&expires_in={expires_in}
You would then have code on the page (or app) hosted at your redirected URL that extracts the access token from the query string, and then you would use it in subsequent requests to the API.
Authorization code grant
An auth code grant has an extra step in the middle between the user getting an access token. A successful user login will redirect the user to {redirect_url}?code={code}
Your app/page then takes the code query string parameter, and uses that to make a POST request to the API at https://api.centreforaviation.com/account/token
The request will need to be a JSON object with the following keys (don't forget to send the Content-Type: application/json header as well with all JSON requests!):
| Parameter | Description |
|---|---|
| grant_type | Tthis should be set to authorization_code. |
| client_id | This should be the identifier for your client |
| client_secret | This is the secret for your client |
| scope | This will be user. |
| redirect_uri | This needs to be the same value as the redirect_uri that you used previously. |
| code | This is the code that was in the contents of the the query string code parameter. |
Access token parameters
If the previous request was successful, you’ll get an object back with the following keys:
| Parameter | Description |
|---|---|
| access_token | Your access token. |
| refresh_token | Your refresh token (if applicable). |
| expires_in | The amount of seconds until the access token is no longer valid. |
| token_type | This is always going to be “Bearer”. |
Using an access token
In order to use an access token, it should be attached to your API requests as an authorization header. The format is:
Authorization: {token_type} {access_token}
So as all tokens are going to be Bearer it’d look like:
Authorization: Bearer eyJ0eXAiOiJKV1QiLCJhbGciOiJSUzI1NiIsImp...
If for some reason you are unable to use headers, you can append the access token as a query string parameter to the request (the parameter name is access_token). This is not recommended though.
Refresh tokens
All access tokens have an expiration date. Generally they’ll last for 8 hours until they’re no longer valid (the exception being A2A-generated tokens, which last for a year). Refresh tokens have an expiration of 1 month, and can be exchanged for a new access (and refresh) token.
If you logged in using the authorization code grant, you would have received a refresh token as well as an access token. If your access token has expired (or is due to expire), you can exchange it for a new one by doing this:
Make a POST request to https://api.centreforaviation.com/account/token with the following:
| Parameter | Description |
|---|---|
| grant_type | Set this to “refresh_token”. |
| refresh_token | The value of your refresh token. |
| client_id | Your client identifier. |
| client_secret | Your client secret. |
If you’re successful, you will be issued with a new access and refresh token - the same output as mentioned in “Access Token Parameters.” The refresh token and the previous access token associated with it will be immediately invalidated, so be sure to replace them as soon as you get a response.